基于Ubuntu Server搭建HomeNAS

基于Ubuntu Server搭建HomeNAS
Ubuntu服务器是Ubuntu操作系统的一个版本,被设计为互联网的主干。Ubuntu 服务器版为各种服务器应用程序提供了一个通用的、极简主义的基础,例如文件/打印服务、Web 托管、电子邮件托管等。
一、系统安装
1.1系统要求
推荐的系统要求是:
CPU:1 GHz 或更高
内存:1 GB 或更多
磁盘:至少 2.5 GB
服务器和桌面差异
Ubuntu Server Edition和Ubuntu Desktop Edition使用相同的 apt 存储库,使得在 Desktop Edition 上安装服务器应用程序与在Server Edition 上一样容易。
一个主要区别是用于桌面版的图形环境没有为服务器安装。这包括图形服务器本身、图形实用程序和应用程序,以及桌面用户所需的各种用户支持服务。
1.2获取安装程序
您可以从https://ubuntu.com/download/server下载适用于 amd64 的服务器安装程序。
1.3安装 Ubuntu 服务器
安装教程参考:
https://ubuntu.com/tutorials/install-ubuntu-server#1-overview
https://ubuntu.com/server/docs/install/step-by-step
从安装介质启动,片刻之后,您应该会在屏幕上看到如下所示的消息……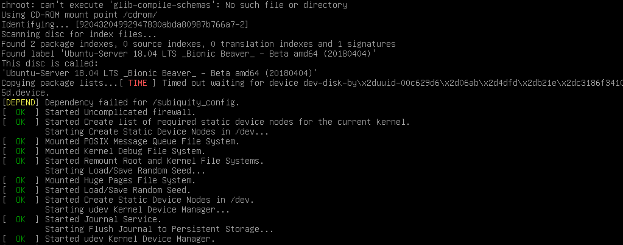
语言选择(选择英文)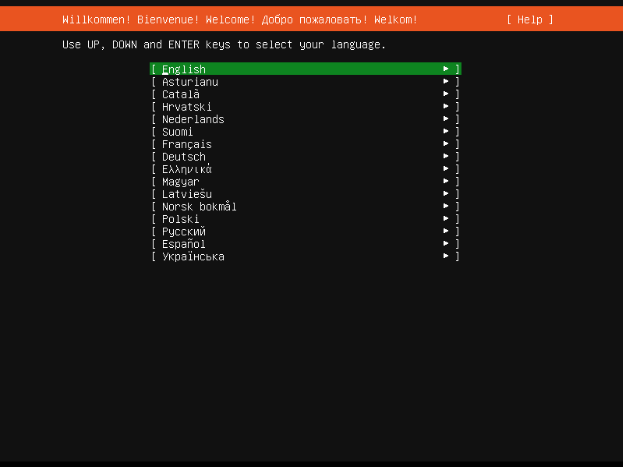
可用安装程序更新(跳过更新,选Continue without updating)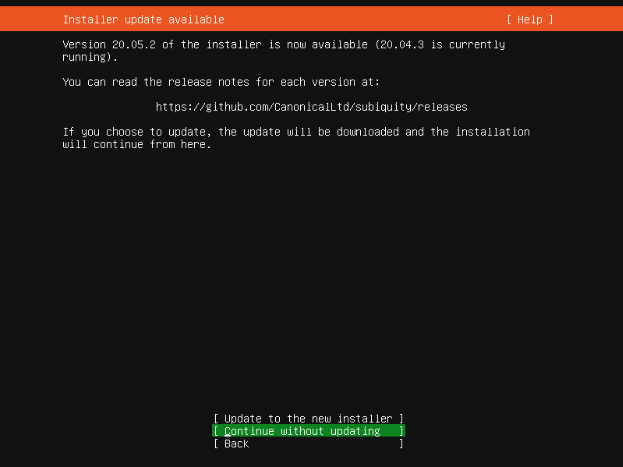
选择正确的键盘布局(保持默认,即美国英文)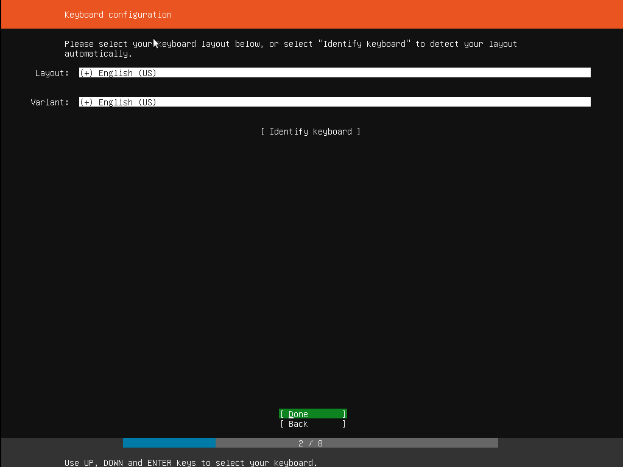
选择安装基础(保持默认安装ubuntu server)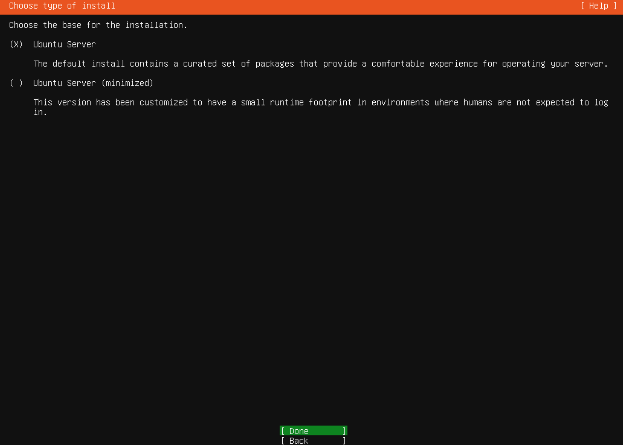
网络配置(默认自动配置)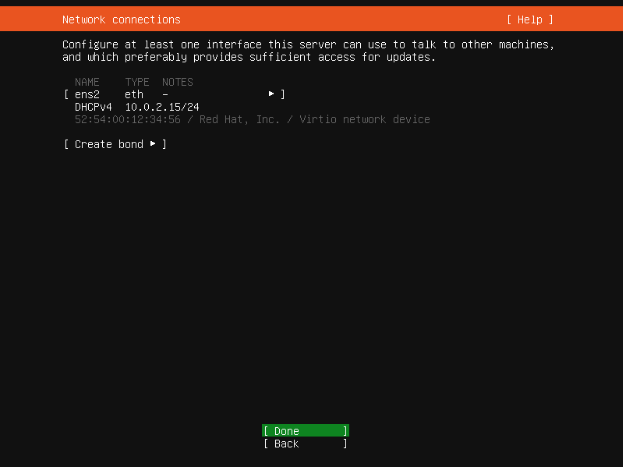
如需配置固定IP,点ens33 eth-edit IPv4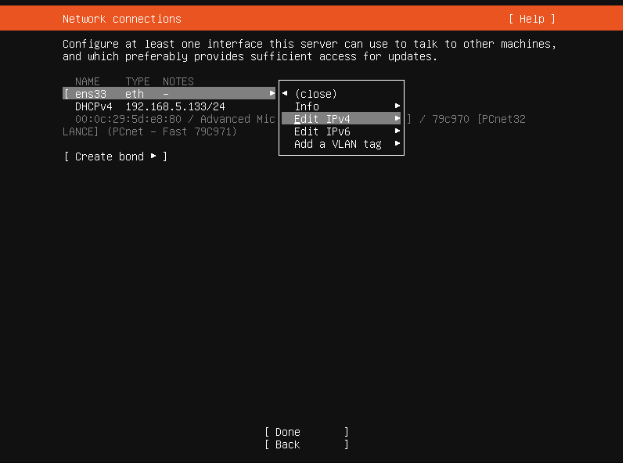
将Automatic (DHCP)调整为Manual,设置内网对应IP信息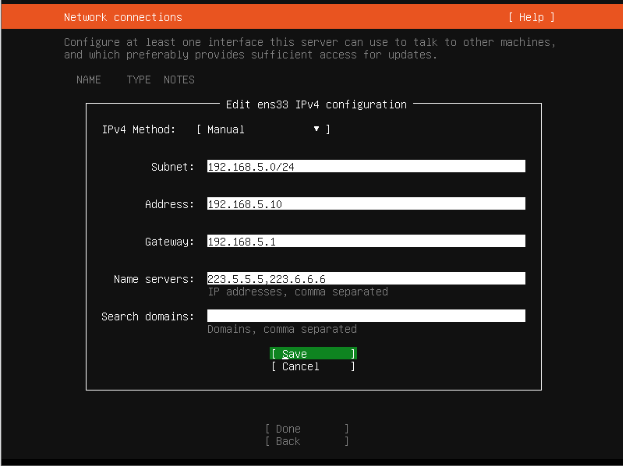
代理配置(如无代理,保留为空)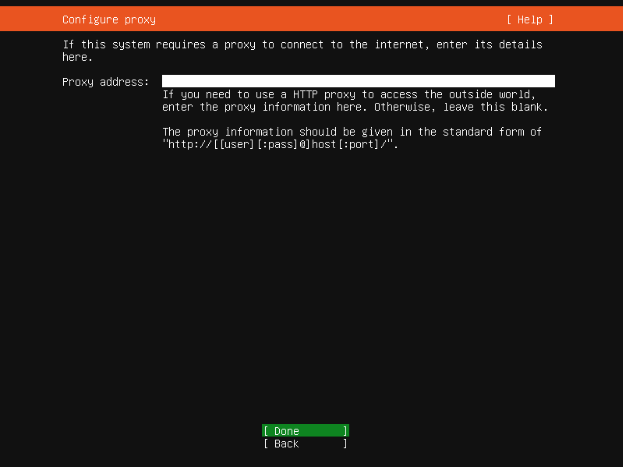
镜像源配置(保持默认地址国内速度也不错,如需更换,自行添加)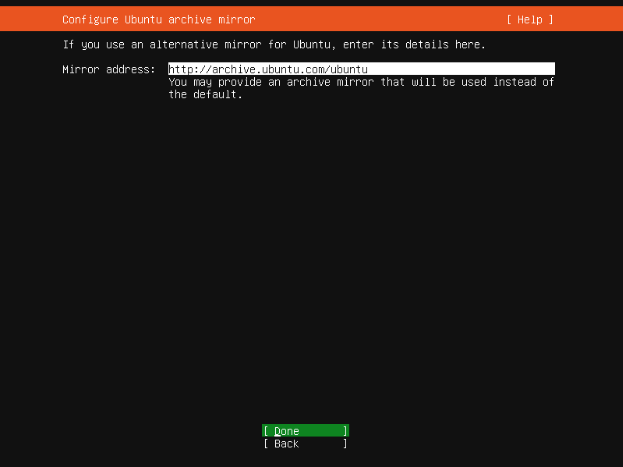
磁盘配置(一般保持默认即可)
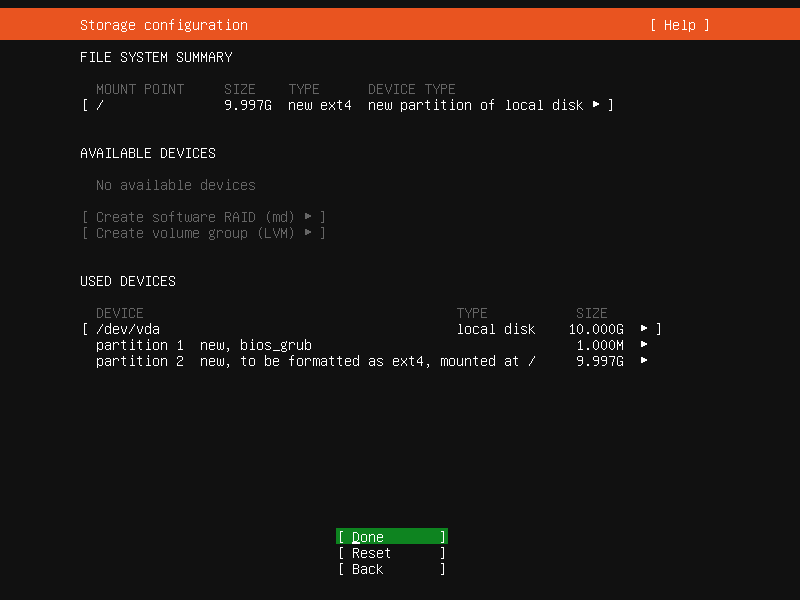
确认磁盘配置(选择Continue确认)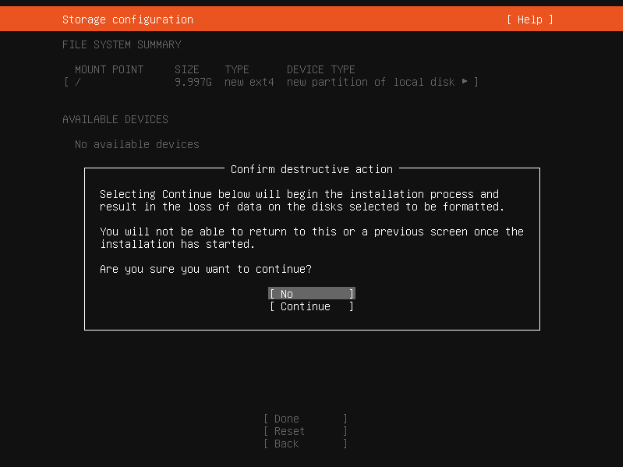
设置个人资料(Pick a username:登陆服务器的用户名,建议和Your name保持一致)
安装SSH(必须安装此项)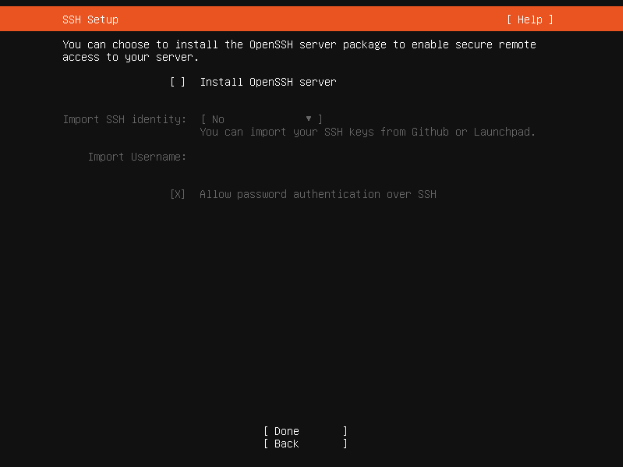
安装附加软件(跳过,全部不安装,理由:通过Snaps安装的软件运行效率低)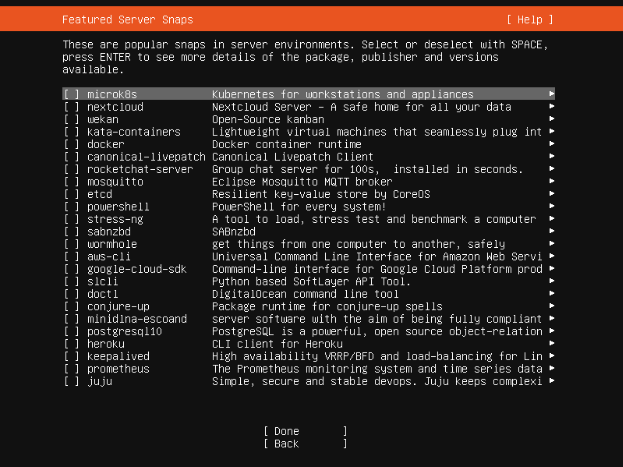
安装日志(系统正在安装,静候)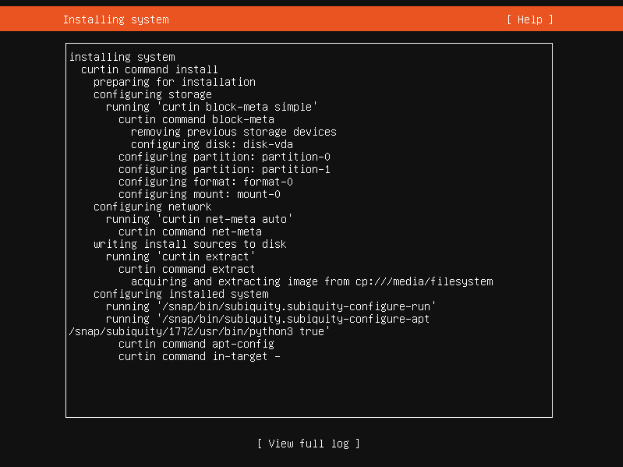
安装完成(选择Reboot重启系统)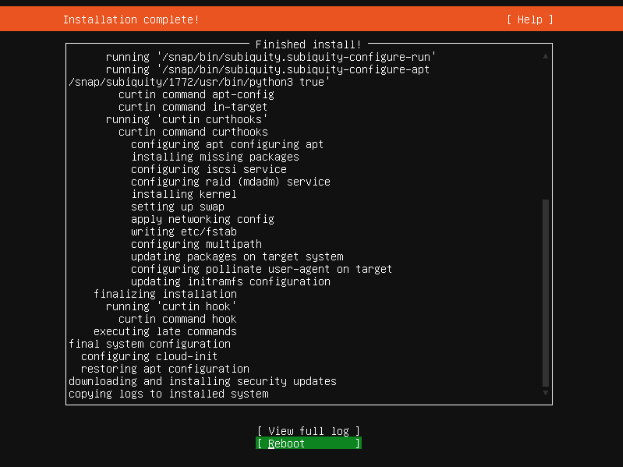
二、系统初始化
2.1 配置国内镜像源
Ubuntu Server 24.04 LTS的软件源配置文件是/etc/apt/sources.list.d/ubuntu.sources。将系统自带的该文件做个备份,将该文件替换为下面内容,即可使用 TUNA 的软件源镜像。
备份/etc/apt/sources.list.d/ubuntu.sources,命令:
1 | sudo cp /etc/apt/sources.list.d/ubuntu.sources /etc/apt/sources.list.d/ubuntu.sources.bak |
执行编辑软件源命令:
1 | sudo vim /etc/apt/sources.list.d/ubuntu.sources |
将文件中内容替换为下面的:
1 | Types: deb |
2.2 更新系统
1 | sudo apt update && sudo apt upgrade -y |
2.3 安装初始必备软件
输入下面命令安装基础必备软件,命令:
1 | sudo apt install curl git vim -y |
三、安装图形管理面板
3.1 安装Cockpit
1 | . /etc/os-release |
设置Cockpit接管网络,需修改/etc/netplan/50-cloud-init.yaml文件,输入命令:
1 | sudo vim /etc/netplan/50-cloud-init.yaml |
在network组最后添加 renderer: NetworkManager 如:
1 | # This file is generated from information provided by the datasource. Changes |
然后应用:
1 | sudo netplan apply |
3.2 安装Cockpit附属组件
官方组件
1、虚拟机,在浏览器中创建、运行和管理虚拟机。
1 | . /etc/os-release |
2、Podman 容器,在浏览器中下载、使用和管理容器。(Podman 取代了 Docker。)
1 | . /etc/os-release |
3、cockpit-pcp,Cockpit面板的历史数据插件
1 | . /etc/os-release |
第三方组件
配置45Drives Repo安装脚本,安装脚本将自动检测您的发行版并将适当的文件添加到您的系统。该脚本还将保存任何与 45Drives 相关的旧存储库(如果存在)。
下面的命令将下载并运行脚本,而不会在您的系统上留下任何东西!
1 | curl -sSL https://repo.45drives.com/setup | sudo bash |
Navigator、File Sharing、Identities三合一安装命令:
1 | sudo apt install cockpit-navigator cockpit-file-sharing cockpit-identities -y |
1、Navigator文件浏览器,Cockpit 的特色文件浏览器。
安装软件包:
1 | sudo apt install cockpit-navigator -y |
2、File Sharing,一个 Cockpit 插件,可轻松管理 Samba 和 NFS 文件共享。
安装软件包:
1 | sudo apt install cockpit-file-sharing -y |
3、Cockpit Identities,用户和组管理插件
安装软件包:
1 | sudo apt install cockpit-identities -y |
4、Cockpit ZFS管理器
安装ZFS软件包:
1 | sudo apt update && sudo apt install -y zfs-dkms zfsutils-linux |
要求:
Cockpit: 201+;NFS (Optional);Samba: 4+ (Optional);ZFS: 0.8+;
安装:
1 | git clone https://github.com/45drives/cockpit-zfs-manager.git |
自动生成的快照名称以 YYYY.MM.DD-HH.MM.SS 格式创建。
建议将以下属性添加到 Samba 配置文件中,以允许在 Windows 资源管理器中访问以前的版本:
1 | sudo nano /etc/samba/smb.conf |
附加到 [global] 部分或个人共享部分
1 | shadow: snapdir = .zfs/snapshot |
3.3 Cockpit调优
自动注销闲置用户
在您首选的文本编辑器中,在 /etc/cockpit/ 目录中打开或创建 cockpit.conf 文件,命令:
1 | sudo vim /etc/cockpit/cockpit.conf |
在文件中添加以下文本,以分钟为单位,这里表示为15分钟后自动退出:
1 | [Session] |
保存文件,重启Cockpit Web 控制台以使更改生效,命令:
1 | sudo systemctl try-restart cockpit |
登录页面添加标题
在您首选的文本编辑器中创建 /etc/issue.cockpit 文件(如果您还没有该文件)。添加您要显示的内容作为文件的横幅。命令:
1 | sudo vim /etc/cockpit/issue.cockpit |
在文件中添加需要展示的内容:
1 | HomeNAS Based on Ubuntu Server LTS. |
内容添加完成后,保存这个文件。
在您首选的文本编辑器中,在 /etc/cockpit/ 目录中打开或创建 cockpit.conf 文件。
1 | sudo vim /etc/cockpit/cockpit.conf |
在文件中添加以下文本:
1 | [Session] |
保存该文件,重启Cockpit Web 控制台以使更改生效,命令:
1 | sudo systemctl try-restart cockpit |
Nginx反向代理Cockpit
在您首选的文本编辑器中,在 /etc/cockpit/ 目录中打开或创建 cockpit.conf 文件,命令:
1 | sudo vim /etc/cockpit/cockpit.conf |
在文件中添加以下文本,将下面内容中的两处’cockpit.domain.tld’替换为你的域名(如为非标端口号,需将端口号一并填写上),将192.168.1.10:9090修改为你对应的内网IP,就可以实现外网内网同时访问Cockpit管理面板:
1 | [WebService] |
保存文件,重启Cockpit Web 控制台以使更改生效,命令:
1 | sudo systemctl try-restart cockpit |
注意:更改完此项之后,将无法使用内网IP登陆Cockpit web管理面板,如需使用内网登陆,需将此项删除掉。
防止暴力攻击Web登陆窗口
编辑defaults-debian.conf文件:
1 | sudo vim /etc/fail2ban/jail.d/defaults-debian.conf |
添加如下内容(只需要插入绿色字体部分内容,灰色部分为默认自带内容):
1 | [sshd] |
保存文件后重启Fail2ban:
1 | sudo systemctl restart fail2ban |
修改Web登陆端口
要更改其端口和/或地址,您应该将以下内容放入文件中:
1 | /etc/systemd/system/cockpit.socket.d/listen.conf |
在该路径中创建尚不存在的文件和目录。该ListenStream 选项指定所需的地址和 TCP 端口。
1 | [Socket] |
注意:第一行的空值是故意的。systemd允许Listen在单个套接字单元中声明多个指令;插入文件中的空值会重置列表,从而禁用原始设备的默认端口 9090。
为了使更改生效,请运行以下命令:
1 | sudo systemctl daemon-reload |
四、系统调优
4.1手动配置IP地址
通过Cockpit面板网络管理界面进行修改。
4.2 调整系统时区/时间
Cockpit-概览-系统时间-点击时间进行校准,时区选择Asia/Shanghai,设置时间选择自动使用NTP,然后点击变更,系统会自动联网进行校准。
4.3 交换空间优化
1、优化交换空间利用率
ubuntu默认是当内存使用达到**40%就向交换空间写入数据,这样会大大的降低电脑运行效率,我们将它改为10%**再向交换空间写入数据
打开 /etc/sysctl.conf 文件,执行命令:
1 | sudo vim /etc/sysctl.conf |
在文件的末尾添加下面两行配置:
1 | vm.swappiness=10 |
vm.swappiness 是用来控制内核在什么时候开始使用交换空间的参数,默认值是 60。将该值调整为 10 表示让内存使用率达到 90% 时才开始使用交换空间。
vm.vfs_cache_pressure 是用来控制内核清理缓存的频率的参数,默认值是 100。将该值调整为 50 表示内核会更倾向于清理文件系统缓存以回收内存。
保存修改并退出编辑器,执行命令:
1 | sudo sysctl -p |
以重新加载配置。
注意:修改内核参数可能会影响系统性能和稳定性,请根据自身需要调整,谨慎操作。
2、永久关闭交换分区
如果你想要永久禁用交换分区,可以编辑 /etc/fstab 文件。
1 | sudo vim /etc/fstab |
在文件中找到包含 /swap.img 的那一行,注释掉该行或者删除整行。
下面是Ubuntu Server 22.04.3 LTS系统示例(注释绿色字体):
1 | # /etc/fstab: static file system information. |
保存并退出文本编辑器。
最后,重启系统以应用更改:
1 | sudo reboot |
这样就禁用了/swap.img 文件作为交换分区。请确保在进行这些更改之前备份重要数据,并理解禁用交换分区可能会影响系统性能的风险。
4.4 安装Tuned系统调优工具
Tuned(又称为tuned-adm)是一个系统调优工具,旨在帮助优化系统的性能和功耗。它允许管理员根据系统的需求选择不同的预定义配置文件或自定义配置文件,以提供最佳的性能和功耗平衡。
安装Tuned软件包
1 | sudo apt update && sudo apt install tuned |
以下是Tuned的一些常用命令和其功能:
1 | sudo systemctl start tuned:启动Tuned服务。 |
在Cockpit Web管理面板上配置Tuned

选择你需要的模式激活使用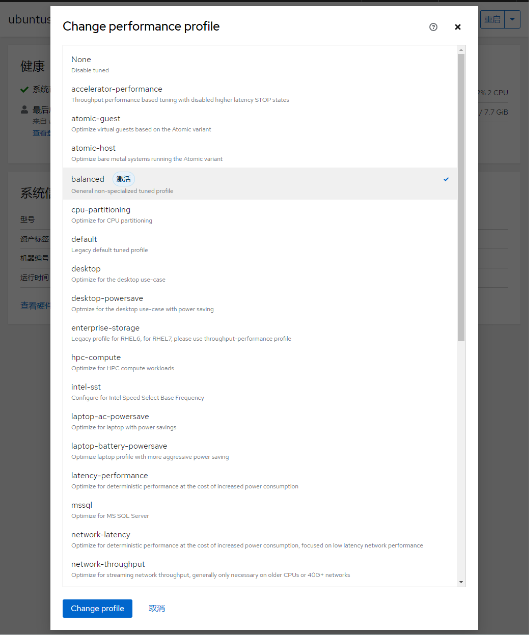
常用TuneD 配置集
1、throughput-performance
针对高吞吐量优化的服务器配置文件。它禁用节能机制并启用 sysctl 设置,以提高磁盘和网络 IO 的吞吐量性能。CPU 调控器设置为 performance。它将 energy_performance_preference 和 scaling_governor 属性设置为 performance 配置集。
2、accelerator-performance
accelerator-performance 配置集包含与 throughput-performance 配置集相同的调整。另外,它会将 CPU 锁定为低 C 状态,以便使延迟小于 100us。这提高了某些加速器的性能,如 GPU。
3、network-throughput
用于吞吐量网络调优的配置集。它基于 throughput-performance 配置集。此外,它还增加了内核网络缓冲区。它继承 latency-performance 或 throughput-performance 配置集,并将energy_performance_preference 和 scaling_governor 属性改为 performance 配置集。
4、Balanced
默认的节能配置文件。它在性能和功耗之间具有折衷。在可能的情况下尽可能使用自动扩展和自动调整。唯一缺陷是增加延迟。在当前的 TuneD 版本中,它启用了 CPU、磁盘、音频和视频插件,并激活了 conservative CPU 调控器。如果支持,radeon_powersave 选项使用 dpm-balanced 值,否则被设置为 auto。它将 energy_performance_preference 属性改为 normal 能源设置。它还将 scaling_governor 策略属性改为 conservative 或 powersave CPU 调控器。
5、powersave
用于最大节能性能的配置集。它可以对性能进行调整,从而最大程度降低实际功耗。在当前的 TuneD 发行版本中,它为 SATA 主机适配器启用 USB 自动挂起、WiFi 节能和 Aggresive Link Power Management (ALPM) 节能。它还为使用低折率的系统调度多核功耗,并激活 ondemand 监管器。它启用了 AC97 音频节能,或根据您的系统,HDA-Intel 节能时间为 10 秒。如果您的系统包含启用了 KMS 支持的 Radeon 图形卡,配置集会将其配置为自动节能。在 ASUS Eee PC 上,启用了动态超级混合引擎。它将 energy_performance_preference 属性改为 powersave 或 power energy 设置。它还会将 scaling_governor 策略属性更改为 ondemand 或 powersave CPU 调控器。
4.5 新用户默认加入users组
编辑/etc/adduser.conf文件,
找到 USERGROUPS 修改变量为 ‘no’(USERGROUPS=no), 这样当创建用户时就不会伴随产生一个新组了.设置 USERS_GID 为所有用户都属于的组的GID,建议设置为USERS_GID=100,即users组。
这样修改好之后,新建用户将不再生成同名用户组,且用户默认加入users组。
4.6 修改homes目录默认路径
编辑/etc/adduser.conf文件,
找到DHOME=/home参数,修改变量为自定义路径即可,例如:
1 | DHOME=/mnt/volume_1/data/home |
4.7 修改用户home目录默认权限
编辑/etc/adduser.conf文件,
找到DIR_MODE=0755参数,修改变量为’0700’(DIR_MODE=0700),0700表示只有该用户拥有文件所有权,其他用户无权访问。
4.8 创建新用户
对于需要创建新的用户,推荐通过adduser命令去增加,只有通过这个命令去增加的用户,前面4.3~4.5之间的修改项方能生效。
创建新用户命令,命令中的”test”为用户名,自行替换为自己需要创建的用户名:
1 | sudo adduser test |
系统将输出如下内容:
1 | ubtest@ubuntutest:~$ sudo adduser test |
创建用户过程中,需要填写新创建用户的密码,建议全名项输入与用户名相同的值,其余项可以留空,或者按需填写。
adduser高级语法可以参考此链接:https://www.runoob.com/linux/linux-comm-adduser.html
4.9 创建容器专属账户
考虑到将要搭建的容器服务众多,甚至一部分服务还可能对 Internet 开放,为了安全,建议创建一个专用的低权限用户来运行各项容器。
1 | sudo adduser application |
使用命令行新建名为 application 的用户(名称可以自定义):
1 | id application |
终端输出内容:
1 | uid=1001(application) gid=1001(application) 组=1001(application) |
这里可以看到都是:1001(application),记住这个值,作为后续容器参数使用。
4.10 启用root用户
1、开启root账户
1 | sudo passwd -u root |
2、为root账户设置密码
1 | sudo passwd root |
终端输出内容:
1 | New password: //设置root密码 |
3、测试root账户
1 | su - |
输入刚才设置的密码
1 | Password: |
5、成功
1 | root@ubuntu:~# |
4.11 配置邮件发送服务
安装Exim4,命令:
1 | sudo apt install exim4 -y |
配置Exim4服务,命令:
1 | sudo dpkg-reconfigure exim4-config |
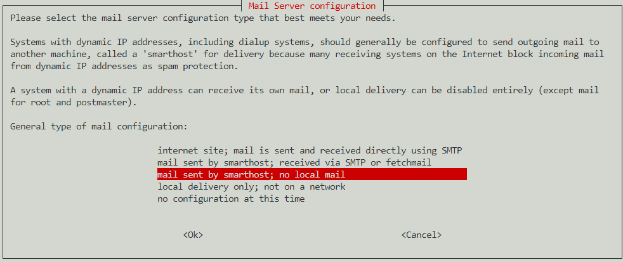
终端输出配置内容:
1 | Please select the mail server configuration type that best meets your needs. |
接下来进行逐步配置:
1、邮件系统设置的常见类型:选择第三项,用smarthost 发信;无本地信件。
1 | General type of mail configuration: 3 |
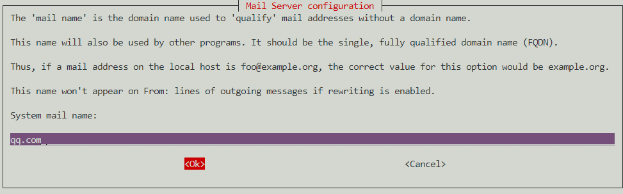
2、系统邮件名称:填写发邮件的邮件域名,如你的发件邮件地址是mymail@qq.com,则这里填写qq.com。
1 | System mail name:qq.com |
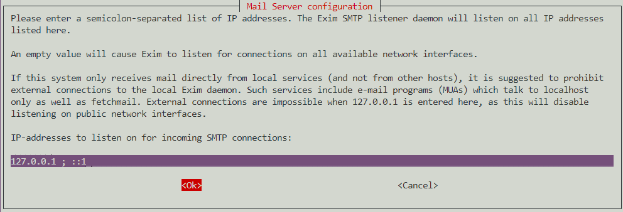
3、要监听入站 SMTP 连接的 IP 地址:填127.0.0.1 ; ::1,这里表示只监听本地IPV4/IPV6端口,也就是只有本机能发信,外部不能访问。
1 | IP-addresses to listen on for incoming SMTP connections: 127.0.0.1 ; ::1 |
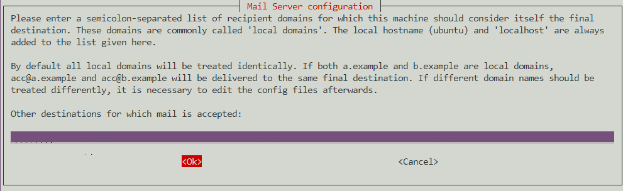
4、其它可接收邮件的目的地址:留空
1 | Other destinations for which mail is accepted: |
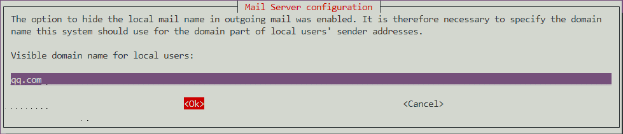
5、本地用户的可见域名:这里和第2步一样,填写你的发件邮箱域名,如qq.com。
1 | Visible domain name for local users: qq.com |
6、发邮件使用的smarthost 的IP 地址或主机名:填写外部SMTP地址。由于qq.com使用的邮件系统是qq,所以这里填写qq的smtp地址smtp.qq.com:587。
1 | IP address or host name of the outgoing smarthost: smtp.qq.com:587 |

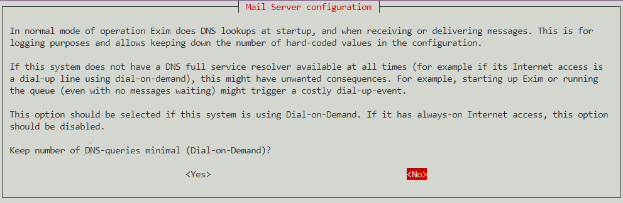
7、保持最小 DNS 查询量吗 (按需拔号,Dial-on-Demand)?否
1 | Keep number of DNS-queries minimal (Dial-on-Demand)? [yes/no] n |
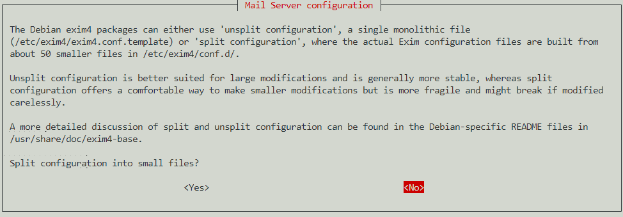
8、将设置文件分拆成小文件吗?否(不搭建复杂的邮件服务器,保持默认就可以,不需要拆分)
1 | Split configuration into small files? [yes/no] n |
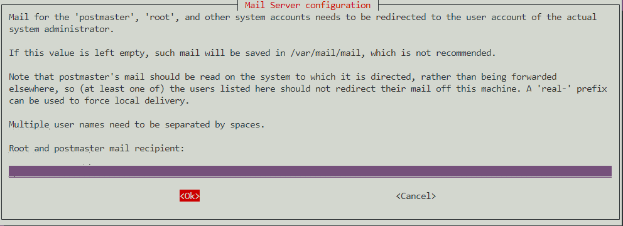
9、Root 和 postmaster 邮件的接收者: 空
1 | Root and postmaster mail recipient: |
到这里就完成了,但还不能发邮件。输入命令:
1 | sudo vim /etc/exim4/passwd.client |
在末尾加入(注意修改用户名和密码,密码为邮箱授权码,非登录密码):
1 | qq-smtp.l.qq.com:yourAccountName@qq.com:y0uRpaSsw0RD |
格式为:发件邮箱SMTP服务器:发件邮箱账号:发件邮箱密码,因为上面我们已经设置smtp服务器地址,所以这里可以填写通配符,当然也可以填smtp地址。
输入命令:
1 | sudo vim /etc/email-addresses |
在末尾加入:
1 | root: mymail@qq.com |
格式是:系统用户名: 发件邮箱地址。
防火墙记得开放587端口,然后重启exim4,输入命令:
1 | sudo /etc/init.d/exim4 restart |
发送邮件测试,首先切换到root用户,输入命令:
1 | su – |
输入发送邮件测试命令(user@example.com改为你要接收邮件的邮箱地址):
1 | sudo echo "test" | mail -s "test" user@example.com |
如果你的邮箱收到邮件,就说明安装成功了。
4.12 添加Github Hosts
打开系统hosts文件,命令:
1 | sudo vim /etc/hosts |
粘贴下面内容进去之后保存退出即可。(此Hosts IP具有时效性,请保持定期更新)
1 | # GitHub Host Start |
4.13 添加TMDB Hosts
打开系统hosts文件,命令:
1 | sudo vim /etc/hosts |
粘贴下面内容进去之后保存退出即可。(此Hosts IP具有时效性,请保持定期更新)
1 | # TMDB Hosts Start |
获取最新IP方法:通过https://www.ipaddress.com或者https://dnschecker.org/country/cn首页,输入api.themoviedb.org和api.tmdb.org获取真实IP地址
4.14 WireGuard家庭组网
WireGuard®是一个极其简单而又快速的现代VPN,采用了最先进的加密技术。它的目标是比IPsec更快、更简单、更精简、更有用,同时避免了大量的头痛问题。它打算比OpenVPN的性能要好得多。WireGuard被设计成一个通用的VPN,可以在嵌入式接口和超级计算机上运行,适合于许多不同的情况。它最初是为Linux内核发布的,现在是跨平台的(Windows、macOS、BSD、iOS、Android),可广泛部署。它目前正在大力发展,但已经被认为是业内最安全、最容易使用和最简单的VPN解决方案。
官网:https://www.wireguard.com/
docker版项目地址:https://hub.docker.com/r/weejewel/wg-easy
各平台客户端下载地址:https://www.wireguard.com/install/
一、WireGuard部署
这里采用Docker部署WireGuard的原因是因为,是因为Docker版提供了WebUI界面,可通过图形界面即可完成WireGuard的相关连接配置,使用起来方便快捷,对新手友好。
Docker CLI部署命令:
1 | docker run -d \ |
容器部署完成后,即可通过http://localhost:51821访问
二、路由器转发UDP端口
因为我是在家里的用的公网IP宽带做服务端,所以需要在路由器上转发UDP端口,按照上面的配置信息,设置的UDP端口是:51820,所以需要转发这个端口,51821是webUI访问端口,可以不转发。下图是华硕路由器设置端口转发示意图: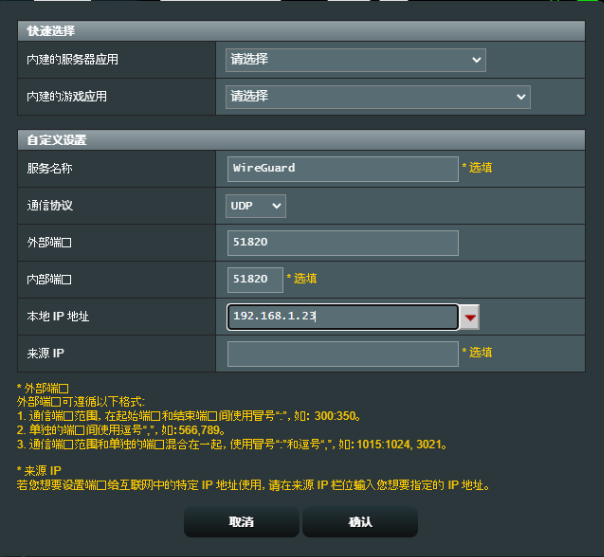
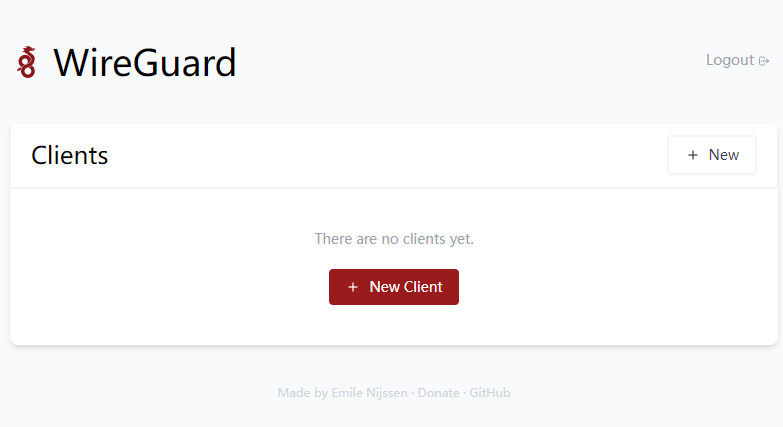
三、创建设备连接
1、点击New Client创建新的连接客户端。
2、在弹出的New Client框中,Name部分内容可以随意填写,一般情况下,建议以使用的设备名称来命令,以方便后期设备多了之后,便于快速区分。比如设置为:xiaomi、oneplus、dellPC、hpPC等等。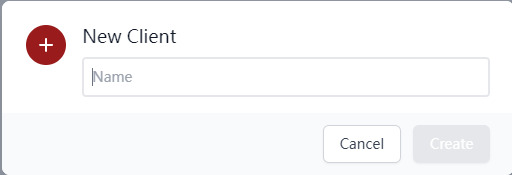
3、获取连接的配置文件或配置信息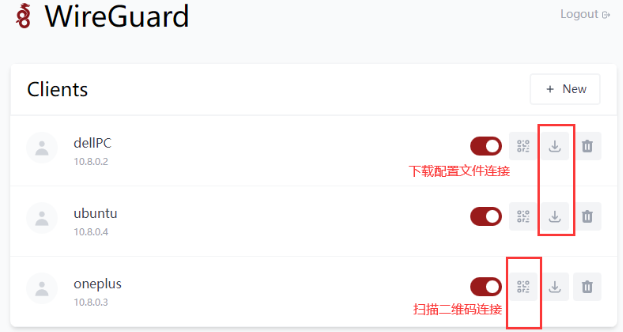
4、PC端连接,打开安装好的WireGuard客户端,点击从文件导入隧道,选择刚刚下载的dellPC.conf文件,点击打开即可。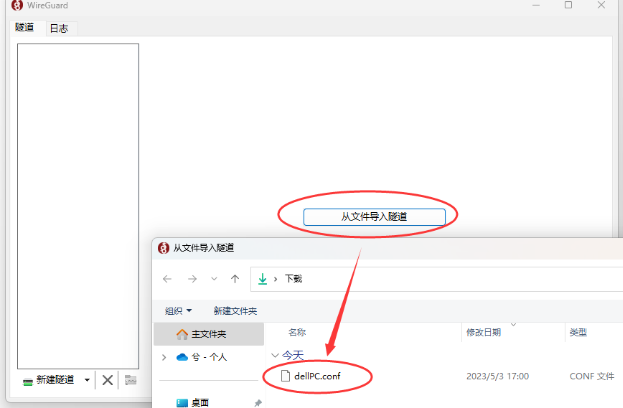
打开之后点击:连接,即可和WireGuard服务端连接上。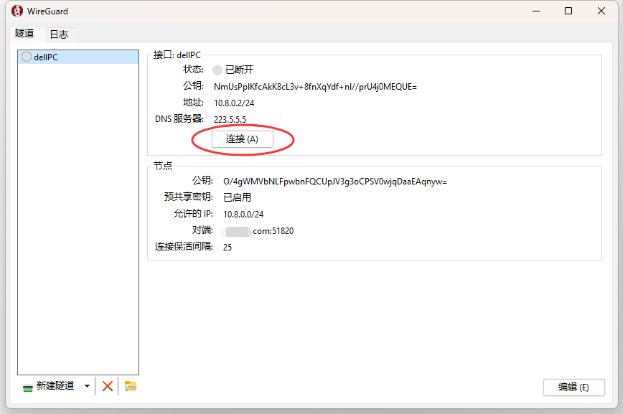
5、Ubuntu Server系统上连接,
安装WireGuard,可以通过以下命令完成:
1 | sudo apt update |
在客户端上创建配置文件 在客户端上,您需要创建一个配置文件,其中包含服务器的公共IP地址和端口,以及客户端的公钥和私钥。您可以使用以下命令创建配置文件:
1 | sudo vim /etc/wireguard/wg0.conf |
在编辑器中,输入刚才下载ubuntu.conf文件里的内容(.conf文件可通过Windows系统的记事本打开):
1 |
|
Endpoint = baidu.com:51820,这里可以填写你服务器的公网IP或者域名,如果是动态公网IP,建议填写域名。
启动WireGuard客户端 在客户端上,您需要启动WireGuard客户端,这可以通过以下命令完成:
1 | #启用 wg-quick 服务,并在系统启动时自动启动该服务。 |
现在,您的Ubuntu系统已经成功连接到您在云服务器上部署的WireGuard服务,您可以通过以下命令来检查连接状态:
1 | sudo wg |
如果一切正常,您将看到类似以下输出:
1 |
|
如果您想禁用WireGuard VPN开机自启动,可以使用以下命令:
1 | sudo systemctl disable wg-quick@wg0 |
请注意,上面命令不会停止当前正在运行的WireGuard VPN服务,如果您当前正在运行WireGuard VPN服务,您可以使用以下命令来停止它:
1 | sudo wg-quick down wg0 |
这将关闭 wg0 接口并停止WireGuard VPN服务。
如果您已经使用 sudo systemctl start wg-quick@wg0 命令启动了 WireGuard VPN 服务,则可以使用以下命令停止服务:
1 | sudo systemctl stop wg-quick@wg0 |
这将停止 wg-quick@wg0 服务并关闭 wg0 接口。
6、手机端连接,手机端连接很简单,安装好WireGuard手机端app之后,打开app点击右下角的+号按钮——选扫描二维码,扫描WebUI端提供的二维码即可连接成功(扫描成功后会弹出框提示输入名称,这个名称可以随意填写,比如设置为:WireGuard)。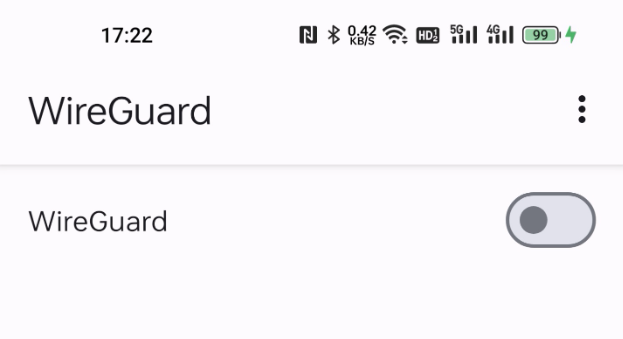
当设备连接成功后,WebUI界面可查看其状态,头像右下角显示有红点,表示连接正常。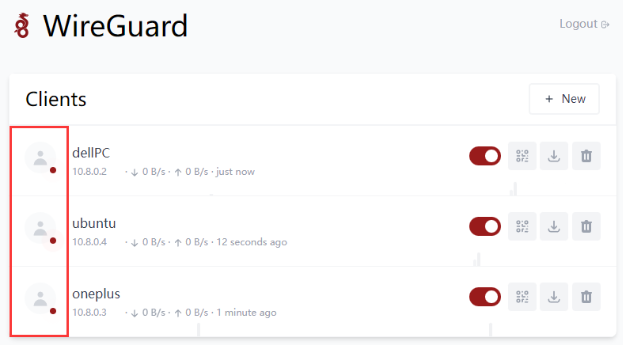
五、安全防护
安全的概念:
1、收紧安全措施有可能达到使系统无法使用的程度。安全性与便利性需要得到平衡。诀窍在于建立一个安全且有用的系统。
2、最大的威胁是(并且一直都会是)用户。
3、最小权限原则:系统的每一部分应该只能访问到它确实需要的东西,除此之外的则不可以。
4、纵深防御:多个独立的层次能带来更好的安全性。当一层防护被攻破时,另一层应该能够阻止攻击。
5、保持一点点的偏执和多疑。如果有件事看起来太好了,不像是真的,那可能确实如此。
6、永远无法令系统 100% 安全,除非把机器从网络上断开,关掉电源,锁进保险柜,用混凝土封住并不再使用它。
7、为失败做好准备。预先为安全措施被攻破的情况制定可供执行的计划。
本章节主要内容参考自Debian安全指南和Arch Linux安全。
Debian安全指南:https://www.debian.org/doc/manuals/securing-debian-manual/ch04s11.zh-cn.html
Arch Linux安全:https://wiki.archlinuxcn.org/wiki/%E5%AE%89%E5%85%A8
执行下列操作前,先给系统用户做个检查。检查是否存在空口令和root权限的账号,确认是否存在异常账号,确认UID为零的账号只有root账号。
操作步骤:
查看root权限账号,使用命令:
1 | sudo awk -F: '($3==0)' /etc/passwd //查看UID为零的账号。 |
查看空口令账号,使用命令:
1 | sudo awk -F: '($2=="")' /etc/shadow //查看空口令账号。 |
加固空口令账号,使用命令:
1 | passwd <用户名> //为空口令账号设定密码。 |
5.1 配置高强度密码策略
为了确保系统的安全性,建议设置的口令复杂度策略为:口令最小长度不小于8,至少包含大写字母、小写字母、数字和特殊字符中的三种。
安装 PAM 的 cracklib 模块,cracklib 能提供额外的密码检查能力。
1 | sudo apt install libpam-cracklib |
修改文件“/etc/pam.d/common-password”。 一旦修改,策略会马上生效。
1 | sudo vim /etc/pam.d/common-password |
找到文件中的以下内容:
1 | password requisite pam_cracklib.so retry=3 minlen=8 difok=3 |
添加参数“minlen”、“dcredit”、“ucredit”、“lcredit”、“ocredit”。如果文件中已有这些参数,直接修改参数值即可,参数说明如表1所示。
1 | password requisite pam_cracklib.so retry=3 minlen=9 dcredit=-1 ucredit=-1 lcredit=-1 ocredit=-1 difok=3 |
| 参数 | 说明 | 示例 |
|---|---|---|
| minlen | “口令最小长度配置项。PAM默认使用了“credits”,因此最小口令长度需要加1,若需要设置最小口令长度为8,则minlen的值应该设置为9。” | minlen=9 |
| dcredit | “口令数字要求的配置项。值为负数N时表示至少有N个数字,值为正数时对数字个数没有限制。” | dcredit=-1 |
| ucredit | “口令大写字母要求的配置项。值为负数N时表示至少有N个大写字母,值为正数时对大写字母个数没有限制。” | ucredit=-1 |
| lcredit | “口令小写字母要求的配置项。值为负数N时表示至少有N个小写字母,值为正数时对小写字母个数没有限制。” | lcredit=-1 |
| ocredit | 特殊字符要求的配置项。值为负数N时表示至少有N个特殊字符,值为正数时对特殊字符个数没有限制。 | ocredit=-1 |
| 5.2 用户连续登陆失败锁定 | ||
| 在3次登录尝试失败后账户将被锁定至少15分钟,或者由管理员将其解锁。 | ||
| 在/etc/pam.d/common-auth中添加如下绿色字体内容,必须按下面顺序添加,命令: |
1 | sudo vim /etc/pam.d/common-auth |
插入内容(只需要插入绿色字体部分内容,灰色部分为默认自带内容):
1 | # |
参数解析:
1 | audit //如果用户不存在,则把该用户名记录到系统日志中。 |
上述参数可以按需添加,如需全部添加,可以参考下面格式:
1 | 示例: |
接着编辑/etc/pam.d/common-account,命令:
1 | sudo vim /etc/pam.d/common-account |
插入内容(只需要插入绿色字体部分内容,灰色部分为默认自带内容):
1 | # |
常用操作命令:
查看所有用户的尝试失败登录次数
1 | sudo faillock |
主要看faillock命令,显示的valid值,v表示有效,i表示无效。
查看指定用户(test用户)
1 | sudo faillock --user test |
解锁指定用户账户(test用户)
1 | sudo faillock --user test --reset |
解锁所有用户
1 | sudo faillock --reset |
重启系统也能解锁所有用户。
5.3 禁止root用户密码登陆
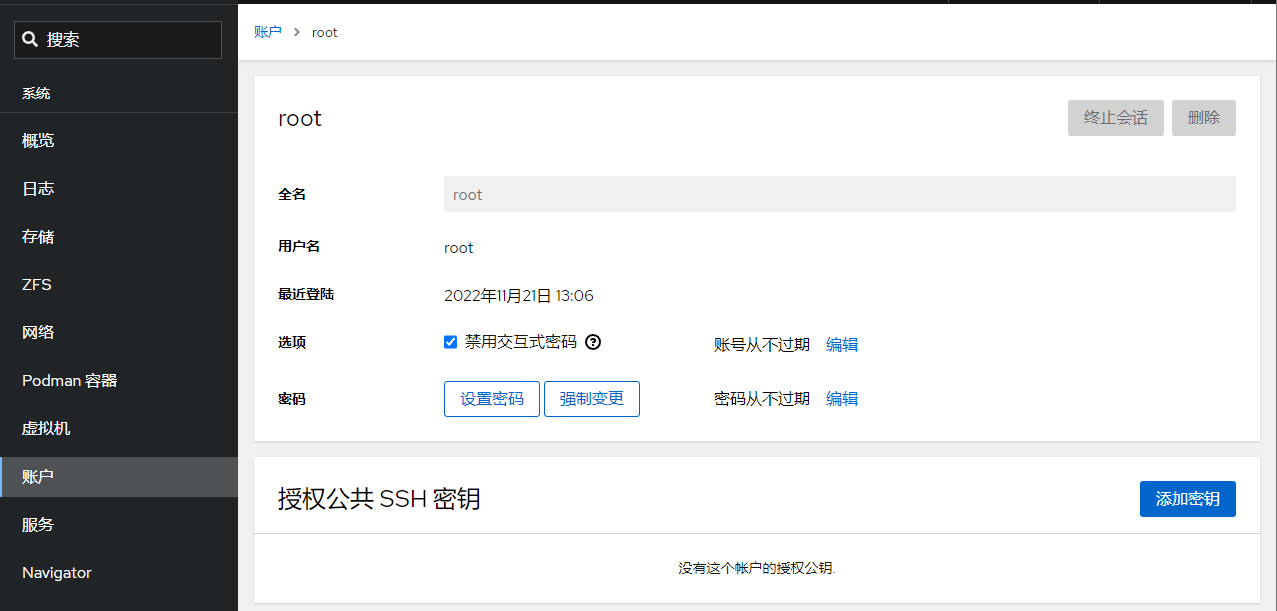
建议是通过Cockpit Web管理面板禁止root用户密码登陆,平时保持其处于禁用状态,如有需要时可以很方便就通过此处开启,用完即随手关闭。
通过Cockpit Web管理面板-账户-root用户-选项-禁用交互式密码,打上勾表示禁止root用户使用密码登陆。
5.4 限制指定用户外网登陆
使用pam_access模块来限制ssh登录源,ssh服务使用的服务名为sshd,pam_access模块使用的配置文件路径为/etc/security/access.conf
在ssh服务中添加pam_access模块
#切换到pam.d目录,备份远文件
1 | cd /etc/pam.d && sudo cp sshd sshd.old |
使用vi编辑器编辑sshd文件
1 | sudo vi sshd |
添加pam_access模块
1 | account required pam_access.so |
在pam配置文件中添加限制条目,条目的格式如下:
1 | +/-:users:origins |
+/- :+号表示授权访问,-号表示拒绝访问
users :users表示限制的用户或用户组,多个用户或组时使用空格分隔
origins:origins表示来源,可以是本地主机名、ip地址/段,域名,有几个特殊关键词:ALL表示所有,LOCAL表示本地,EXCEPT表示除了
当有多条规则时,执行的顺寻是自上而下
切换到配置文件目录,备份原文件
1 | cd /etc/security && sudo cp access.conf access.conf.old |
编辑配置文件
1 | sudo vi access.conf |
在文件最后添加一行,只允许用户kim通过192.168.0.90地址登录
1 | +:kim:192.168.0.90 |
5.5 限制指定用户夜间登陆
pam_time模块用来限制cockpit登录的时间,cockpit服务使用的服务名为cockpit,pam_time模块使用的配置文件路径为/etc/security/time.conf,在需要对服务器进行维护的时候,或者是在特定时间禁止用户登录服务器。
1、在cockpit服务中添加pam_time模块,打开文件:
1 | sudo vim /etc/pam.d/cockpit |
添加pam_time模块(只需要插入绿色字体部分内容,灰色部分为默认自带内容)
1 | # List of users to deny access to Cockpit, by default root is included. |
2、在pam配置文件中添加限制条目,条目的格式如下:
1 | services;devices;users;times |
services:可以使用的services都包含在/etc/pam.d目录中
devices :可以使用的device有:表示所有设备,!ttyp表示除虚拟设别外的所有设备,ttyp*远程登录设备
users :限制的用户或组,使用列表时,各元素之间使用符号|分隔
time :限制的时间,由2段组成,第一段是首字母大写的星期缩写,第二段是时间段
星期缩写:Mo、Tu、We、Th、Fr、Sa、Su
特殊缩写:Wk工作日、Wd周末、Al每周的每天、WdSa周日、WdSu周六、WkMo除周一外的工作日
3、编辑配置文件
1 | sudo vim /etc/security/time.conf |
4、在文件末尾添加一行,允许用户root和test在每天早上8点至晚上23点之间登录
1 | cockpit;*;root|test;A10800-2300 |
5.6限制用户同时登陆数量
在大多数Linux发行版中,有一个叫做limit.conf的文件,你可以定义一个用户或用户组的最大并发SSH会话数量。如果特定用户试图进入系统的次数超过允许的登录次数,他/她将被拒绝访问。
操作步骤,编辑/etc/security/limits.conf文件:
1 | sudo vim /etc/security/limits.conf |
在文件末行添加下面内容:
要限制特定用户(例如ostechnix)的并发 SSH 会话数,请在末尾添加以下行:
1 | ostechnix hard maxlogins 2 |
如果要限制一组用户的连接数,请添加以下行:
1 | @mygroup hard maxlogins 3 |
将@mygroup替换为您的组名。在这种情况下,mygroup 中的所有用户都不能登录超过3次。
如果要限制系统中所有用户(全局)的 SSH 会话,请改为添加以下行:
1 | * hard maxlogins 3 |
这里,星号表示全局(即系统中的所有用户)。定义每个用户/组或整个系统的最大会话数后,保存并关闭文件。
如需限制系统中Cockpit Web管理面板用户同时登陆数量,可以按如下配置添加内容:
1 | sudo vim /etc/pam.d/cockpit |
插入下列内容(只需要插入绿色字体部分内容,灰色部分为默认自带内容):
1 | #%PAM-1.0 |
保存后退出即刻生效。
5.7限制用户SU
限制能su到root的用户。操作步骤
使用命令:
1 | sudo vim /etc/pam.d/su |
修改配置文件,在配置文件中添加行。例如,只允许sudo组用户su到root,则添加
1 | auth required pam_wheel.so group=sudo |
添加后如下所示:
1 | # |
5.8 用户登陆邮件通知告警
通过 PAM 模块,就可以实现用户登录,root 权限获取时,通过邮件等方式进行通知。以实现,预先知道,预先警惕的目标,降低受影响的范围。以下是通过 PAM 模块实现的邮件通知用户登录的功能。
1、以管理员身份登录虚拟机,并切换成 root 用户。
2、新建脚本,命令:
1 | sudo vim /etc/pam.d/login-notifiy.sh |
(该脚本可以存放在任意位置,但是需要将后续的路径指定好即可),内容如下:
1 | #!/bin/bash |
脚本中的user@yourdomain.com修改为你要接收通知的邮箱地址。
3、编辑文件
1 | sudo vim /etc/pam.d/common-session |
4、在文件最后追加一行:
1 | session optional pam_exec.so debug /bin/bash /etc/pam.d/login-notifiy.sh |
5、保存并退出。
至此,每一个用户登录都会发邮件通知给收件人,内容包括用户名以及登录的 IP 地址信息。如果遇到陌生 IP,那么就要注意,该主机是否正在遭受攻击。
5.9 超时自动注销活动状态
设置系统登录后,连接超时时间,增强安全性。操作步骤,使用命令:
1 | sudo vim /etc/profile |
修改配置文件,在文件末行添加下列内容:
1 | # 超时自动退出 |
即超时时间为三分钟。
5.10 记录所有用户的登录和操作日志
通过脚本代码实现记录所有用户的登录操作日志,防止出现安全事件后无据可查。
操作步骤
1 | sudo vim /etc/profile |
打开配置文件,在配置文件末行输入以下内容:
1 | # 在 history 命令中启用时间戳 |
运行命令加载配置生效:
1 | sudo bash -c "source /etc/profile" |
注意:/var/log/history 是记录日志的存放位置,可以自定义。
通过上述步骤,可以在 /var/log/history 目录下以每个用户为名新建一个文件夹,每次用户退出后都会产生以用户名、登录IP、时间的日志文件,包含此用户本次的所有操作(root用户除外)。
5.11 禁止SSH服务开机自启动
为了系统的安全起见,建议SSH服务在有需要用的时候通过Cockpit Web面板开启,平常则处于关闭状态。开启路径:Cockpit-服务-ssh.service-启动
关闭ssh服务开机自动启动,命令:
1 | sudo systemctl disable ssh |
常用操作:
设置开机自动启动ssh服务,命令:
1 | sudo systemctl enable ssh |
单次开启ssh,命令:
1 | sudo systemctl start ssh |
单次关闭ssh,命令:
1 | sudo systemctl stop ssh |
5.11 安装防火墙
推荐使用firewalld防火墙的理由是,Cockpit Web管理面板搭配firewalld防火墙可以提供一个可视化的防火墙管理界面,对新手友好。
Ubuntu 22.04 已UFW默认安装。最好只使用一个防火墙。所以禁用 UFW:
1 | sudo ufw disable |
然后更新系统包:
1 | sudo apt update |
下一步是从apt存储库安装firewalld
1 | sudo apt -y install firewalld |
检查运行状态
1 | sudo systemctl status firewalld |
在终端输出的内容中将看到:
1 | Active: active (running) |
安装完成之后默认启动运行,需关闭之后进入cockpit配置规则。
关闭firewalld
1 | sudo systemctl stop firewalld |
登陆cockpit-网络-防火墙-打开防火墙-添加新区-信任级别- public,允许的地址-整个子网
Firewalld高阶使用
GeoIP和Firewalld组合使用的常见案例主要涉及到基于地理位置的防火墙规则。
5.12 安装自动封锁软件
第 1 步 — 安装 Fail2ban
Fail2ban 在 Ubuntu 的软件存储库中可用。首先以非根用户身份运行以下命令来更新您的软件包列表并安装 Fail2ban:
1 | sudo apt update |
Fail2ban 安装后会自动设置后台服务。但是,默认情况下它是禁用的,因为它的某些默认设置可能会导致不良影响。您可以使用以下systemctl命令验证这一点:
1 | sudo systemctl status fail2ban.service |
终端中输出的内容:
1 | ○ fail2ban.service - Fail2Ban Service |
第 2 步 – 配置 Fail2ban
Fail2Ban的配置文件:/etc/fail2ban/
Fail2Ban的安装目录:/usr/share/fail2ban/
Fail2Ban日志文件:/var/log/fail2ban.log
达到阈值之后的执行Fail2Ban的动作的配置文件:/etc/fail2ban/action.d/
包含Fail2Ban所有的过滤规则:/etc/fail2ban/filter.d/
fail2ban 服务将其配置文件保存在该/etc/fail2ban目录中。在本教程中,您将创建jail.local. 你可以通过复制来做到这一点jail.conf:
1 | sudo cp /etc/fail2ban/jail.{conf,local} |
现在您可以开始进行配置更改。vim在或您喜欢的文本编辑器中打开文件:
1 | sudo vim /etc/fail2ban/jail.local |
当您滚动文件时,本教程将查看您可能想要更新的一些选项。位于文件顶部附近部分下的设置[DEFAULT]将应用于 Fail2ban 支持的所有服务。在文件的其他地方,有用于[sshd]和用于其他服务的标头,其中包含将在默认设置之上应用的特定于服务的设置。
1 | #全局设置 |
不要忘记在每次配置更改后重新启动 Fail2ban 服务。重启命令:
1 | sudo systemctl restart fail2ban |
常用命令:
1 | #启动 |
配置中文邮件格式(可选项,默认为英文):
1 | sudo cp /etc/fail2ban/action.d/mail-whois.{conf,local} |
然后编辑mail-whois.local文件,
1 | sudo vim /etc/fail2ban/action.d/mail-whois.local |
替换成下面的内容,(只需要替换绿色字体部分内容,灰色部分为默认自带内容):
1 | # Fail2Ban configuration file |
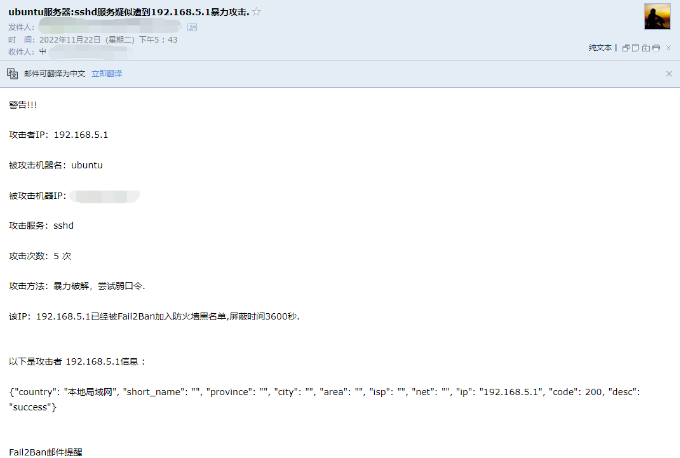
说明
通过curl ifconfig.co获取服务器的外网IP地址,方便知道哪台机报出来的告警。
通过curl https://ip.useragentinfo.com/json?ip =
不要忘记在每次配置更改后重新启动 Fail2ban 服务。重启命令:
1 | sudo systemctl restart fail2ban |
配置完成后效果:


5.14 安装病毒防护软件
ClamAV 是一个开源的防病毒软件,可用于检测木马,病毒,恶意软件和其他恶意威胁。适用于 Linux、macOS 和 Windows 平台。
一、安装ClamAV:
1 | sudo apt-get update |
二、更新病毒数据库
在安装完成后,需要运行以下命令来更新ClamAV的病毒数据库:
1、关闭ClamAV病毒数据库更新服务
1 | sudo systemctl stop clamav-freshclam |
2、更新病毒数据库:
1 | sudo freshclam |
3、启动ClamAV病毒数据库更新服务:
1 | sudo systemctl start clamav-freshclam |
三、使用ClamAV
1、扫描整个系统:在终端窗口中输入以下命令,扫描整个系统:
1 | sudo clamscan -r / |
2、扫描指定目录:在终端窗口中输入以下命令,扫描指定目录:
1 | sudo clamscan -r /path/to/directory |
3、删除被感染的文件:在终端窗口中输入以下命令,删除被感染的文件:
1 | sudo clamscan --remove /path/to/file |
4、扫描压缩文件:在终端窗口中输入以下命令,扫描压缩文件:
1 | sudo clamscan -r /path/to/archive.zip |
5、执行定期扫描:在终端窗口中输入以下命令,创建一个每天执行一次的定期扫描:
1 | sudo crontab -e |
在打开的文件中添加以下行:
1 | 0 0 * * * clamscan -r / > /var/log/clamav/scan.log |
这将在每天的午夜(0点)执行全系统扫描,并将扫描结果保存在/var/log/clamav/scan.log文件中。
官网:http://www.clamav.net/
六、存储管理
6.1 硬盘管理
通过Cockpit Web管理面板进行管理。
6.2 软Raid管理
通过Cockpit Web管理面板进行管理。
6.3 硬盘自动休眠
1 | hdparm |
参考:https://manpages.ubuntu.com/manpages/jammy/man8/hdparm.8.html
6.4 硬盘健康监测
SMART是现代硬盘驱动器中的一个系统,旨在报告可能表明即将发生故障的情况。smartmontools是一个免费的软件包,可以监控 SMART 属性并运行硬盘自检。
安装smartmontools:
1 | sudo apt install smartmontools |
检查驱动器的SMART功能
要确保您的驱动器支持 SMART,请键入:
1 | sudo smartctl -i /dev/sda |
其中 /dev/sda 是你的硬盘。这将为您提供有关驱动器的简要信息。最后两行可能如下所示:
1 | SMART support is: Available - device has SMART capability. |
启用SMART
如果您的驱动器未启用 SMART,您可以通过键入以下内容来启用它:
1 | sudo smartctl -s on /dev/sda |
检查硬盘整体健康状况
1 | sudo smartctl -H /dev/sda |
此命令应返回:
1 | === START OF READ SMART DATA SECTION === |
如果它没有返回 PASSED,您应该立即备份所有数据。您的硬盘驱动器可能出现故障。
测试驱动器
您可以在安装驱动器时运行任何类型的测试,尽管性能可能会有所下降。可以在驱动器上进行三种类型的测试:
短
扩展(长)
传输
要查找执行每个测试所需时间的估计值,请键入:
1 | sudo smartctl -c /dev/sda |
最有用的测试是扩展测试(长)。您可以通过键入以下内容来启动测试:
1 | sudo smartctl -t long /dev/sda |
结果
您可以通过键入以下内容来查看驱动器的测试统计信息:
1 | sudo smartctl -l selftest /dev/sda |
要显示 IDE 驱动器的详细 SMART 信息,请键入:
1 | sudo smartctl -a /dev/sda |
要显示 SATA 驱动器的详细 SMART 信息,请键入:
1 | sudo smartctl -a -d ata /dev/sda |
注意:这也适用于通过 SCSI 堆栈运行并显示为 /dev/sdX 的新内核中的 IDE 驱动器
部分字段的含义
1 | === START OF READ SMART DATA SECTION === |
使用示例:
1 | # 监测硬盘1 |
上述例子来源于/etc/smartd.conf:
1 | # 第一个 ATA/SATA 或 SCSI/SAS 磁盘。 监控所有属性,启用 |
Scrutiny 是一种硬盘驱动器运行状况仪表板和监控解决方案,将制造商提供的 SMART 指标与实际故障率相结合。用于 smartd SMART 监控的 WebUI
项目地址:https://github.com/AnalogJ/scrutiny
安装教程:https://www.tauceti.blog/posts/easy-hard-disk-health-monitoring-with-scrutiny-and-smart/
安装教程:https://blog.csdn.net/wbsu2004/article/details/124095004
6.5 安装联合文件系统
mergerfs是一个联合文件系统,旨在简化跨众多商品存储设备的文件存储和管理。它类似于mhddfs、unionfs和aufs。
项目地址:https://github.com/trapexit/mergerfs
参考:https://blog.csdn.net/linkyy5/article/details/126080546
6.5 安装SnapRaid
官网:http://www.snapraid.it/
参考:https://wiki.archlinux.org/title/SnapRAID
七、Docker服务
7.1 安装Docker
在新主机上首次安装 Docker Engine 之前,您需要设置 Docker 存储库。之后,您可以从存储库安装和更新 Docker。(推荐通过存储库安装,方便后期版本升级。)
A、设置存储库
1.更新apt包索引并安装包以允许apt通过 HTTPS 使用存储库:
1 | sudo apt-get update |
2.添加 Docker 的官方 GPG 密钥:
1 | sudo mkdir -p /etc/apt/keyrings |
3.使用以下命令设置存储库:
1 | echo \ |
B、安装 Docker 引擎
1.更新apt包索引:
1 | sudo apt-get update |
2.安装 Docker Engine、containerd 和 Docker Compose。
1 | sudo apt-get install -y docker-ce docker-ce-cli containerd.io docker-compose-plugin |
3.hello-world通过运行镜像验证 Docker Engine 安装是否成功 :
1 | sudo docker run hello-world |
查看Docker版本命令:
1 | sudo docker version |
查看Docker Compose版本命令:
1 | sudo docker compose version |
(来源:https://docs.docker.com/engine/install/ubuntu/)
C、配置国内镜像源
1 | mkdir -p /etc/docker |
7.2 容器管理
Portainer是一个可视化的容器镜像的图形管理工具,利用Portainer可以轻松构建,管理和维护Docker环境。 而且完全免费,基于容器化的安装方式,方便高效部署。
1 | #请将路径/srv/volume_1/data/docker/portainer替换为您的,此路径存储Portainer配置文件。 |
安装完成后,可以通过打开 Web 浏览器并转到Portainer管理界面:
http://localhost:9000或https://localhost:9443
(来源:https://docs.portainer.io/start/install/server/docker/linux)
7.3 反向代理
Nginx Proxy Manager 是用于管理 Nginx 代理主机的 Docker 容器,具有简单、强大的界面。它使您可以轻松地转发到您在家里或其他地方运行的网站,包括免费的 SSL,而无需对 Nginx 或 Letsencrypt 了解太多。
官网:https://nginxproxymanager.com
7.4 数据库
7.5 文件存储
7.6 影音服务
7.7 下载服务
7.8 照片管理
7.9 Blog管理
八、UPS不断电系统
apcupsd 包提供了一个守护进程,它将监视您的APC UPS,并在不再向 UPS 供电时关闭系统。
教程参考:https://help.ubuntu.com/community/apcupsd